Tuesday, October 23, 2012

Sausage and Quinoa with Italian Herbs

I was in a wanting pasta mood yesterday.  But in trying to be good diet wise, I decided that wasn't the greatest idea.    I have moved onto Phase 2 of the South Beach Diet which does reintroduce many things back into my diet - HELLO FRUIT!!!  Basically, Phase 2 is all about moderation.

I haven't quite gotten out of my breakfast rut yet - it's eggs, turkey sausage and turkey bacon for the most part.  Greek yogurt is one of my snacks, but it's honestly always been an afternoon snack for me.  And I grabbed Asian pears to got with some cottage cheese for my morning snack this week since fruit is no longer a no-no.

I'm still working on making my way through my chunky lentil soup since I ended up with 8 portions of that, so I had some of that for lunch today.

Dinner, is the Sausage and Quinoa with Italian Herbs that make up the title of this post.

Ingredients:
- 12-oz Jimmy Dean Premium Pork Regular Sausage
- 1.5 cups Ancient Harvest Inca Red quinoa
- 24-oz Pacific Organic Vegetable Broth
-  onion
- head garlic
- fresh basil
- dried basil
- dried oregano
- dried fennel seeds
- margarine (I prefer butter but margarine is SBD friendly and butter is not)
- salt
- pepper

Dice up the onion, garlic and fresh basil.  Add in the salt, pepper, and dried basil, oregano and fennel seeds to taste.  Melt your margarine in a pot and add in the above.  Cook until the onion and garlic are tender and everything is fragrant.


While I was cooking the onion and garlic, I also had the sausage browing in another pan.


Once the sausage was browned, I added it to the pot with the onion, garlic and herbs.  I also added in the vegetable broth and quinoa, stirring to combine everything.  I then followed the directions on the package to cook the quinoa.  Basically bringing everything to a boil, putting the lid on the pot, reducing the heat, and simmering until the quinoa was fully cooked.

The end result was an Italian tasty dinner that I don't have to feel guilty about!!


- - - - - - - - - - - - - - - - - - - - - - - - - - - - - - - - - - - - - - - - - - - - - - - -


Progress to Date: 7.6-pounds lost, BMI = 28.9 (30.5 when I started)

Tuesday, October 16, 2012

Chunky Lentil Soup

- 2 cups lentils
- 2 14.5-oz cans diced tomatoes in tomato sauce
- 2 red onion onions, diced
- diced garlic cloves
- diced ginger root
- fresh basil leaves
- dried basil
- salt
- pepper
- 4 cups water

I sautéed the diced onion, garlic, salt pepper, and diced basil in the pot until the onions were soft.

I then added the rest of the ingredients to the pot, brought everything to a boil, and then turned it down to a simmer. I cooked it until everything was tender, adding water as necessary. The final result was think and chunky.

I also put the hand blender in and ran it for about. I didn't completely puree everything, so it's still decently chunky.

Thursday, October 11, 2012

Lifestyle changes

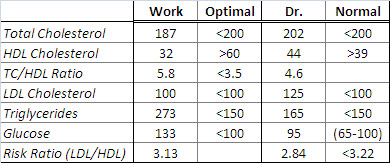
We had our "Biometric Screening" at work a few weeks ago.  I was expecting the results to be less than ideal, specifically in the areas of cholesterol and BMI/body fat percentage.  I was right on both of those counts, but the one curveball that was throw in was my fasting glucose: 133.  That number earned me a special counseling session with the staff where they had me sign a waiver that stated that they strongly advised me to see my doctor ASAP and that I won't sue them if my health gets even worse.

*SIGH*

My bad habits have officially caught up with me and unless I change, I am looking at type II diabetes and being put on medication, etc.

I did see my primary care doctor the week after the biometric screening.  They ran a test on my a1c in the office.  It came back at 5.4 meaning non-diabetic.  She did add a caveot to that though - if my blood sugars just now starting spiking, the a1c wouldn't reflect that quite yet.  Which is why she wants to see me back in 3 months for repeat bloodwork.

For interested parties, a comparison of my bloodwork numbers from the test done at work and the work run at whatever lab, along with what they consider to be normal/acceptable, etc.:


I received counseling on diet, exercise, etc.  My doctor has told me that I have 3 months to loose 12 pounds, do what I can to get my blood work in better shape, etc.  She has said that even if no one else is going to hold me accountable, that she will.  If I don't meet these goals, she will put me on diabetes related medication(s).

To help me reach these goals, she recommends 40 minutes of vigorous exercise 4 times a week.  And and omega3 supplement.  She also said that the South Beach diet largely encompasses the dietary and nutrition goals that she outlined for me and recommended a couple of their books.  She said that at a high level, the ratio of my net carbs (grams of carbs - grams of fiber) to grams of protein needs to be less than or equal to 2.  That I am allowed a maximum of two servings of fruit a day (since fruit generally has more sugar than veggies).  She recommends tart apples and oranges, making sure to include all of the pithy crap that I so tediously pick off on the rare occasion that I do eat one.  Bananas, grapes and pineapple are TOTALLY off limits.  Starchy veggies (corn, potatoes, peas, etc.) and any product made with them need to be avoided as well.

I have been keeping track of how well I hit the carbs to protein ratio, and looked back a bit since I have actually been keeping a food diary for a while:


So, at this point, I've completed my first full week of Phase 1 of the South Beach diet.  I work on making my way through the bad stuff in my fridge before starting, mostly because I didn't see the point in wasting perfectly good food.

In a nutshell, Phase 1 SUCKS!!  No sweeteners.  No fruits.  No grains.  What is allowed during Phase 1 - lean protein, high fiber vegetables, low fat dairy and health fats.  I downloaded the South Beach Diet iPhone app so that I will always have the list of what foods I can and cannot eat with me.  This link gives a good summary outline of everything and you can click on things for more details for each phase, etc.  The good news though is that Phase 1 lasts for 2 weeks.  Phase 2 then allows you to reindroduce a lot of food in moderation and lasts until you reach your goal weight.  Phase 3 allows you to eat anything, keeping moderation in mind, and you stay there to maintain your goal weight.

Also, I've never been a breakfast person.  At all.  But I am not a three meal a day and two snacks kinda girl.  For example, today's menu:

- Breakfast: Diet Dr Pepper (would usually be green tea but I wasn't at my house last night so simplicity won out), 2 eggs scrambled and 2 Jennie-O breakfast sausage links

- Snack: one serving of Daisy 2% small curd cottage cheese

- Lunch: salad consisting of diced red onion, cucumber, raddish, red cabbage, 1/2 cup chickpeas, 1.6-oz fat free feta cheese, 3 slices of Jennie-O turkey bacon, crumbled

- Snack: 1 6oz cup Fage Total 0 Greek yogurt and some sugar free Smucker's preserves

- Dinner: shredded beef with McCormick 30% less sodium taco seasoning, Old El Paso vegetarian refried beans, 2% milkfat shredded mexican cheeses, and some red onion

- Desert: sugar free gelatin mixed with sugar free Cool Whip


 I have already lost 5 pounds.  I can thank my sinus and ear infections for the jump start...  Using this calculator, or just going with the 30.5 that was measured during the biometric screening at work, I fell into the obese category starting out.  With my five pounds lost, my current BMI is 29.4 which puts me into the overweight category.  It's a little milestone, but I will take it!!

I am not sure what my doctor feels is healthy goal weight since right now the current goal is to be down 12 pounds by the end of December.  Using the formula for BMI and using the upper end of normal (24.9) and using my height of 62.5-inches, the corresponding weight is 138.6-pounds.  Which is 25-pounds away.  The low end of normal for me is 102.8-pounds (60.8-pounds away).

Right now I am focusing on the 12-pounds for the end of the December.  And I figure that my doctor and I will go from there.

- - - - - - - - - - - - - - - - - - - - - - - - - - - - - - - - - - - - - - - - - - - - - - - -

Progress to Date: 5-pounds lost, BMI = 29.4


Vanilla Bean Cupcakes with Buttercream Frosting

Vanilla Bean Cupcakes
makes approximately 30 cupcakes

Ingredients

- 3 cups cake flour
- 1 tablespoon baking powder
- 1/2 teaspoon salt
- 1 vanilla bean, split lengthwise
- 16 tablespoons butter (2 sticks), cubed & softened at room temperature
- 2 cups organic cane sugar
- 5 large eggs, at room temperature
- 1 1/4 cups buttermilk, at room temperative
- 1 tablespoon vanilla extract


Directions

Preheat the oven to 350 degrees.  Line two cupcake pans with paper liners and set aside.


In a medium mixing bowl, combine the cake flour, baking powder salt. Mix together and set aside.


Add the butter to the bowl of an stand mixer fitted with the paddle attachment.  Scrape the vanilla bean seeds into the bowl of the mixer with the butter, reserving the pod for another use, such as:

The pods can be rinsed, dried and placed in granulated or confectioners sugar to produce what is called vanilla sugar. The dried bean is cut in half and buried in 1 - 2 cups sugar, covered, and left for a week or two to allow the vanilla to permeate through the sugar.

This vanilla sugar can be used in place of regular sugar and adds a wonderful vanilla flavor to desserts.  One tablespoon vanilla sugar has the flavoring power of approximately 1/4 teaspoon vanilla extract.

Beat the butter and vanilla bean mixture on medium-high speed until light and creamy in color, about 3 minutes.  Scrape down the sides of the bowl and beat for one more minute.


Add the sugar to the butter mixture, 1/4 cup at a time, beating 1 minute after each addition. 


Add the sugar to the butter mixture, ¼ cup at a time, beating 1 minute after each addition.  Mix in the eggs one at a time until incorporated.  Scrape down the sides of the bowl after each addition.  Combine the buttermilk and the vanilla extract in a liquid measuring cup.  With the mixer on low speed, add the dry ingredients alternately with the wet ingredients, beginning and ending with the dry ingredients and mixing just until incorporated.  Scrape down the sides of the bowl and mix for 15 seconds longer.
Divide the batter between the prepared paper liners, filling each about 2/3 of the way full (you will likely have batter left over after filling 24 wells.)  Bake 18-22 minutes, or until a toothpick inserted in the center comes out clean.  Allow to cool in the pans 5-10 minutes, then transfer to a cooling rack to cool completely.  Replace paper liners and bake remaining batter if desired.  Frost cooled cupcakes as desired.

Yield: approximately 30 cupcakes

Tuesday, June 14, 2011

Homemade Strawberry Ice Cream

Now that the whirlwind of packing, moving, working, unpacking, cleaning, etc. is settling down, I'm finally looking to start exploring and finding sights in the current hometown.  Unfortunately, this weekend was not all that great weather wise - high likelihood of awesome thunderstorms all weekend.  Actually, Thursday through Sunday - and one of Thursday evenings storms actually brought hail with it.

Not sure where entirely the idea came from, but strawberry picking seemed like a fun idea since I haven't done it in years.  Not since I was a kid I believe.

After doing some research online, Springdale Farms in Cherry Hill was my place of choice.  All in all, my loot for the day was 6+ pounds of fresh picked straweberries!


The vast majority of those 6+ pounds have been cleaned, diced up and frozen for used in future recipes.


Since A - the greatest BFF ever! - gave me an ice cream maker for my birthday last year, some homemade fresh picked strawberry ice cream seemed like a good first strawberry related concoction.

I didn't want to just do vanilla ice cream with chucks of strawberries.  I search online and found several recipes, but the one I settled on is most similar to the vanilla custard ice cream that was my standard go-to recipe last year.

Adapted from Emile Lagasse's Fresh Strawberry Ice Cream Recipe


- 4 cups fresh strawberries, washed, hulled and diced
- 1.5 cups Sugar in the Raw
- 2 cups half and half
- 2 cups heavy cream
- 0.5 vanilla bean, split in half
- 6 egg whites

In a blender, combine the 4 cups strawberries with 0.5 cup of the sugar and processed until smooth.


In a bowl, separate the 6 egg yolks, whisking the yolks together and reserving the egg whites in a separate container (the egg whites, along with some sauteed onion and diced basil, made for some tasty scrambled eggs for breakfast Sunday morning).

In a saucepan, combine the remaining 1 cup sugar, half and half, heavy cream and vanilla bean.

I have found that just cutting a slit in the bean,opening it up and placing it into the mix, combined with the head the mixing action of a metal whisk is enough to not only bring out the flavor from the bean, but release it's specks as well.

Heat the mixture to a simmer.  Add a cup or so of the liquid to the egg yolks, mixing until smooth, and then added it to the saucepan, whisking until well incorporated.  Bring the mixture back to a simmer and cook for 5-6 minutes.

Remove from the heat and let sit for approximately 20 minutes - this allows the vanilla flavor to more fully infuse into the mixture.  Strain the mixture to remove any clumps.

Combine the mixture with the strawberries and sugar, mixing until fully incorporated.

Cool the mixture completely - I tend to make my mix at night and then leave it in the fridge until the next day when I'm ready to make the ice cream.

Process the mixture according to your ice cream maker's instructions.


Friday, June 3, 2011

Last Night's Lesson

Lately I seem to be enjoying playing the how empty can I get my gas tank game.  A couple of times in the Budget truck on the way out here and then last night in my car.

When I left work close to 10:30pm, I was already tired and ready to be home.  So discovering that my gas tank was low - an estimated fuel range of 48 miles remaining - was not at all what I was in the mood for.  With a 20 mile and change drive to get back to the apartment, I knew that I could make it there.  I just preferred to get Millie filled last night so it would be one less thing to worry about this morning.

Prior to coming to NJ I had no clue that I am not allowed to pump my own gas here.  In fact, according to Wikipedia, "All stations in New Jersey and Oregon offer only full service and mini service; attendants are required to pump gas because customers are barred by statutes in both states from pumping their own gas. New Jersey banned self-service gasoline in 1949 after lobbying by service station owners. Proponents of the ban cite safety and jobs as reasons to keep the ban."

Sure this might seem all awesome and great, but apparently not all stations are open 24-hours, and the gas station closest to you house/apartment might be one of those that isn't...  The two attendants did give me somewhat sketchy directions to a 24-hour Wawa that was not quite where I expected it to be based on their directions, but the bottom line was that I found it.  While driving in the dark and trying to find it though, I kinda felt like I was walking that fine line between do I go back to the apartment and get the gas in the morning, or has the driving around I've already done mean that I might not be able to make it there and I'm better off continuing my gas station quest??

In order to avoid this late night stress in the future, I'm going to be more cognizant of how much gas I have remaining in my tank and not let it get so low between fill ups.  Since I apparently do not have the luxury of 24 hour gas stations everywhere that I go now.

Wednesday, June 1, 2011

Yesterday's Discoveries

Even before moving here, I had been warned about Camden, New Jersey.  As in, drive through it and don't get out of your car.

Wikipedia even says, "Although once a thriving center for manufacturing and industry, Camden is perhaps best known for its struggles with urban dysfunction. "

Despite this warning, it should come as no shock to those who know me that I went there yesterday.  And got out of my car.  The entire purpose of the trip was to acquire and E-ZPass tag so that I don't have to stop every morning to the pay the $4 toll for crossing the Walt Whitman Bridge.  Mostly so that I don't have to stop, which does save a bit of time, but also because there are discounts for high usage.  It's also helpful for me who does not generally have cash on me.

Since I was in a hurry to leave yesterday in time to get to the E-ZPass Customer Service Center, I forgot to grab my USB charger cord for my iPhone.  It wasn't a problem in terms of the charge left on my phone.  I however had not yet taken the time to research what could potentially be "good" radio stations (good being relative to personal tastes of course), and had been playing music off of my iPhone playlist while in the car.

For some reason I tend to find it interesting to see what the difference is in radio stations that have the same number.  I think that the biggest difference in genre was 97.1.  I was actually pleasantly surprised to determine that between the local 93.3, 102.1  and 106.1 that I could pretty much find


DFW:
93.3 - i93
97.1 - The Eagle
102.1 - The Edge
106.1 - Kiss FM


Philly
93.3 - Everything that Rocks
97.1 - Christian Music Radio
102.1 - Q102: All the Hits
106.1 - Mix

Tuesday, May 31, 2011

Memorial Day Cook-In


Not that I have a grill at home, but being back in an apartment means no grilling, and thus no cook-outs, so K and I had a Memorial Day cook-in.

I was able to take some time to scope out a Whole Foods this weekend - which I was very excited to do seeing as the closest grocery store to the apartments is a Super Wal-Mart, and the grocery store snob in me doesn't consider that to be a real grocery store.

I had intended to pick up some fresh fruit to go with dinner, but the fresh corn on the cob caught my eye and won.  The sweet potatoes for the fries were another impulse buy, but seeing as fries and burger go so well together.  :)

I paired my go-to recipe for black bean burgers with my first every attempt at homemade hamburger buns.  Since the black bean burger patties tend to cook better when they are thinner, they tend to be a bit big, so the larger, flatter homemade buns worked perfectly in my opinion.

My potato salad is actually my mom's potato salad (minus a few tweaks that perhaps do make it my own) and there really isn't a recipe for it.  It is made by look and taste.  One of these days I may attempt to create a recipe for it, by in the meantime, you will just have come over when I make some and enjoy it that way.  :)